

Table of Contents
With migRaven You can migrate the permissions of Novell servers. This concerns both Novell Netware and Novell OES. The rights of the Novell servers are read out and must be converted into NTFS rights. This actual state is in migRaven read. migRaven migrates the permissions and creates permission and list groups. Finally created migRaven the authorization and list groups in AD and and writes the new directory tree with new permissions. All steps of the Novell migration are described step by step.
0. Voraussetzungen
0.1. LDAP version 3
To identify the members of the groups listed in the trustee list migRaven An LDAP connection to your Novell server. The prerequisite is that the Novell server works with the LDAP version 3. This was introduced to 1998. migRaven requires the attributes, schemas, and standards set for this release.
0.2. AD users
The users who are to be translated from eDir must be available in Windows AD.
1. Determine permissions from the Novell server
1.1. Source: Novell Open Enterprise Server
1.1.1. .trustee_database.xml with the permission information
The information about the explicitly assigned permissions in Novell Netware file systems is given in the ".Trustee_database.xml" saved. There is a file with this name for each volume. You can find these files in the directory "/ MEDIA / NSS /volume_name/._NETWARE/ "(volume_name must be replaced by the name of the volume). The for the volume SYS can be found under "/USR/NOVELL/SYS/._NETWARE". These files contain the directories, the permissions and the authorized persons.
1.1.2. Convert the XML files to CSV format
For further processing, the content of the XML files must be converted into CSV format. We have developed a Powershell script that does this conversion. With our script, all XML files that are in the same directory as the script itself are converted into easily readable csv files. In addition to the separation of the directory and authorization information, the account information is read out and brought into Microsoft-compliant form. The entryDN (Distinguished Name - unique name for X.500 directory objects) from the .trustee_database.xml is converted into a sAMAccountName (login name). The connection between the Novell and Windows accounts can later be established using the CN (common name) of the Novell entryDN and the Windows sAMAccountName. That means both names must be the same. If this is not the case, you can use the User mapping another AD field must be used in which the name must first be entered, which corresponds to the CN of the Novell-entryDN.
Sample format of the trustee xml
…………………
…………………
………….
Novell has changed this structure in other OES versions. We can help too. Contact us.
You can find the script here:
migRaven needs an Excel file with the rights
1.1.4. Processing the data
table structure
The CSV file is loaded into a spreadsheet for easy viewing and evaluation, cleanup and optimization.
| depth | Path | Law | trustee |
| 1 | \ Buchhaltung1 | RWCEMF | .Buchhaltung_G.aikux-novell |
| 1 | \ Buchhaltung2 | RWCEMF | .Rolle_2.aikux-novell |
| 1 | \ d.menerer | RWCEMFA | .dm.Einfach.aikux-novell |
Table 1: Table with Novell rights
To the for migRaven To obtain the necessary form, the Novell must be converted into NTFS rights. More about this in section 1.3.

Image 2: Conversion of the table with the Novell OES rights into the for migRaven necessary format with NTFS rights
1.3. Define authorization mapping: Implement Novell rights in MS rights
Transfer the Novell rights to the Microsoft Notation
The rights in the Novell system and thus also in the trustee file are written based on the Unix notation. This notation can not be transferred directly to Microsoft.
The Novell rights must be replaced by Windows rights in the table.
It can always be that you have not worked under Novell with standardized rights and therefore in the table the most diverse rights.
Ultimately, you must choose one of the following five Windows permissions. To do this, enter the abbreviations for the NTFS rights instead of the Novell rights in the appropriate column.
We recommend the following translation of the rights
NTFS rights Novell rights
re instead of RF in Novell, mx instead of RWF in Novell, mx instead of RWCEMF in Novell, mx instead of RWCEMF in Novell, mx instead of RWCEMFA in Novell
Table 2: Convert Novell Rights to NTFS Rights
The Novell rights in this table must be replaced by NTFS rights. That's best done in a spreadsheet
The values in the "Rights" column must be replaced by Windows NTFS rights.
| depth | Path | NTFS rights | Trustee |
| 1 | \ Buchhaltung1 | MX | .Buchhaltung_G.aikux-novell |
| 1 | \ Buchhaltung2 | MX | .Rolle_2.aikux-novell |
| 1 | \ d.menerer | F | .dm.Einfach.aikux-novell |
Table 3: Table structure for migRaven
2. Requirements for migRaven create
2.1. Create accounts on the Windows server
The Novell Microfocus USER accounts must exist in Windows AD. Groups don't matter because they are always regenerated.
All users must be present, including those that indirectly appear in the groups named in the trustee file.
If the Novell CN and the AD SAM are not the same, the Novell feature supports you User mapping. For this purpose, a different user attribute is used in AD to store the different Novell name for the mapping.
2.2. xlsx table in migRaven laden
After cleansing the spreadsheet, it is saved as an xlsx file and placed directly into migRaven imported.

Image 3: With "Open file" the created xlsx file can be read in with NTFS rights.
2.3. LDAP connection data to the Novell server
An LDAP interface connects to the Novell eDirectory. About it can migRaven determine the container members. To do this, the parameters for establishing a connection to the Novell server must be specified in the group configuration under the "Novell" tab.
Four details are required:
- the address of the Novell server (IP address or server name), e.g. 192.168.0.44
- the LDAP port, only 389 is supported
- the name of the admin with a fully qualified name (distinguished name, DN), e.g. CN = admin, OU = Berlin, O = aikux.
- The password of this admin is requested when starting the project.
The admin that logs in here must be in the same organization (o = company) as the groups and users that are to be resolved.

Image 4: Novell Server and Novell Admin names can be configured in the configuration of migRaven are stored, the right entry for the user mapping
About this connection provides migRaven establishes an LDAP connection to the Novell server and accesses its eDirectory. For the groups and containers specified in the trustee file fetches migRaven the member names from the eDirectory of the Novell server. Then check migRavenwhether the specified users and the resolved group members exist in the Active Directory of the Windows server. If not, this is acknowledged with an error message in the status column.
If the usernames in Novell and in Windows AD are not identical, this helps User mapping. To do this, we find the field "assigned attribute of AD" in the configuration (Figure 4, right part). Standard equals migRaven the Novell name with the sAMAccount name of the user in the AD. For different names, an alternative attribute can be selected here in which migRaven find the Novell name again. Please note the requirements and functionality of the user mapping documentation.
3. Migration with migRaven begin
The process is as follows:
- Store settings centrally (3.1)
- New migration project in migRaven generate (3.2)
- View and adjust the intermediate result (3.3)
- Create authorization groups in AD (4.1)
- Create target directories and assign authorization groups to them (4.2)
- Copy data into the new structure (4.3)
3.1. migRaven configure for migration
migRaven must always be called as administrator.
group configuration
When creating new permission structures according to the best practice recommendations from Microsoft migRaven Authorization groups. For these we have to define the group type, their storage location in the AD and the name design. If these groups are to be used by 8MAN later, we have to consider the requirements and possibilities 8MAN offers for naming its authorization groups. We provide you with detailed instructions with the documentation "Cooperation of migRaven and 8MAN" available.
As the "Type" for the authorization groups, one of the three group types must be selected. We recommend using Universal Groups because they only add 8 bytes instead of 40 bytes for global groups to the Kerberos token. Their disadvantage is that they can not record local groups.
These authorization groups are stored in an OU in the AD. We fix this OU here:
"In the OU (canonical name):" test.local \ novell (example). migRaven create an OU with your server name underneath. In this land the created groups.
Under the rider "Surname" we design the group name.
The group name is composed of several delimited elements.
- Prefix: The prefix can be freely selected, eg "8M".
- Group type: u, dl and g are possible for the group type. Since we favor universal groups, “u” appears.
- Directory: The directory follows, at migRaven it is obligatory. It can be supplemented by release and server names.
- Access rights: As a suffix, abbreviations for the access rights are provided:
- li - for list rights
- re - for read / execute
- w - for read / write
- m - for modify
- mx - for modify plus (like modify, but prevents the deletion, moving and renaming of the authorization endpoint)
- f - for full control migRaven are these short names since the 2.1.1020 version. variable.
- Separator: The underscore, hyphen and space are possible separators.
In the preview for the group names we see: 8M_u_ _
3.2. New project in migRaven for the migration
After we have created the conditions, we call the Novell migration .

Image 5: Start Novell Migration
If these parameters are available, it continues.
In the Project name can enter any text, eg Novell1.
In the share path the destination address (Windows server and destination share) is specified, eg \\ server \ share \ Novell1.
-> The release path is important because the future authorization groups are named on this basis.
Then we can do that Start migration. The admin password must be entered and the connection must be checked. Only then gives migRaven the start button free.
The data prepared in the spreadsheet is imported in the next step. For this purpose, the edited xlsx file is loaded.
In the validate provides migRaven connect to the Novell server.
If a connection to the Novell server cannot be established, please check the correctness of the parameters for the Novell server under the "Novell" tab.
If the connection could be established, the "Status" column provides information on users and members not found.
Error cause may be that the named users or objects were not found in the current Windows AD.
Missing accounts must be created in AD and then in migRaven read in the AD again. Then you can repeat the Novell migration.
3.3. New groups / permissions of migRaven let form
Save
Created based on the read and possibly corrected permissions migRaven new permission groups according to best practice recommendations from Microsoft. These new authorization structures can be displayed in detail in a visualized directory tree.
The new authorization structure will only be realized through the next two steps. That is, nothing has been written to your system yet.
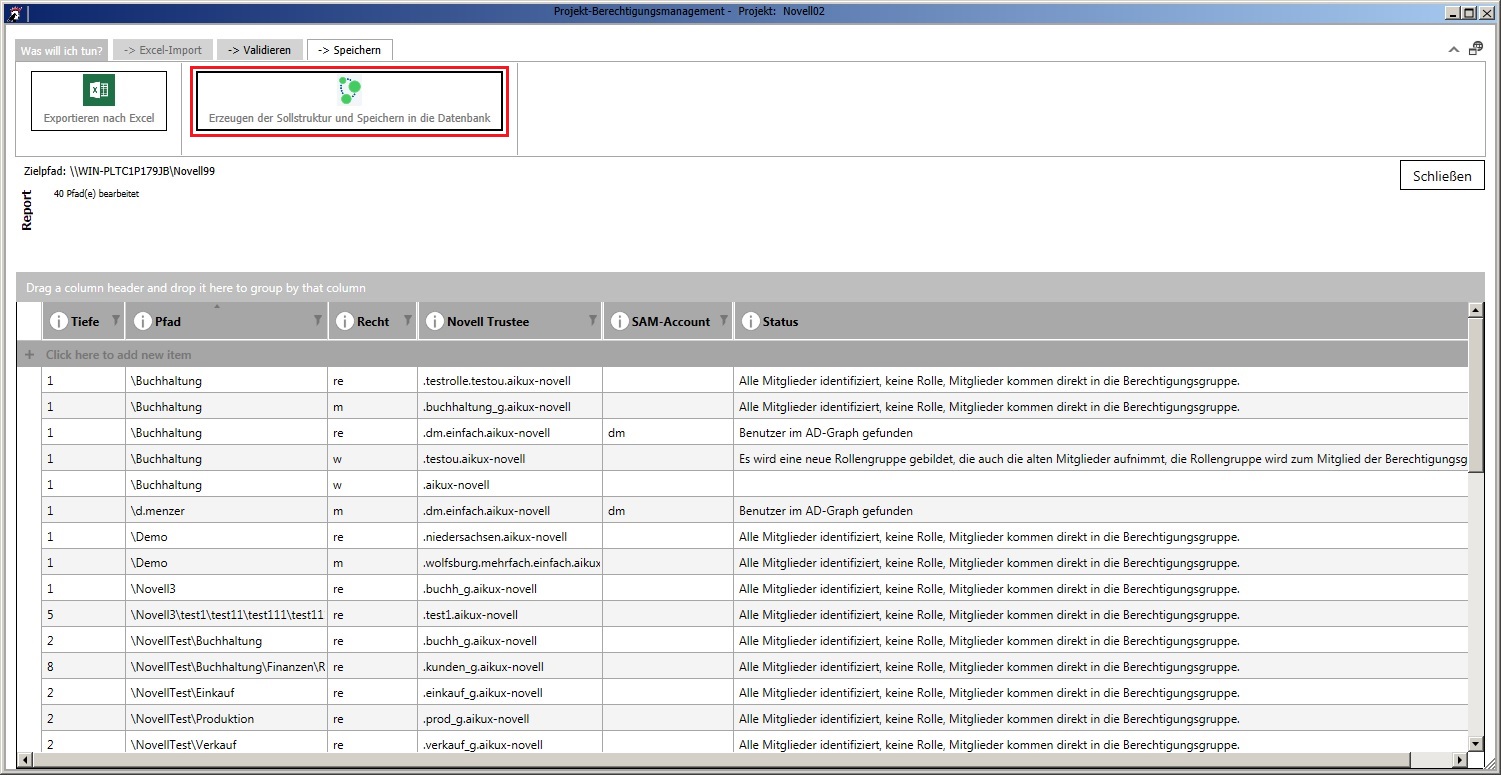
Image 6: Save the new authorizations in the database
3.4. Control of Future Rights in the View Target State
Then branches migRaven in the visual representation. Here you can check the planned authorizations again in detail.
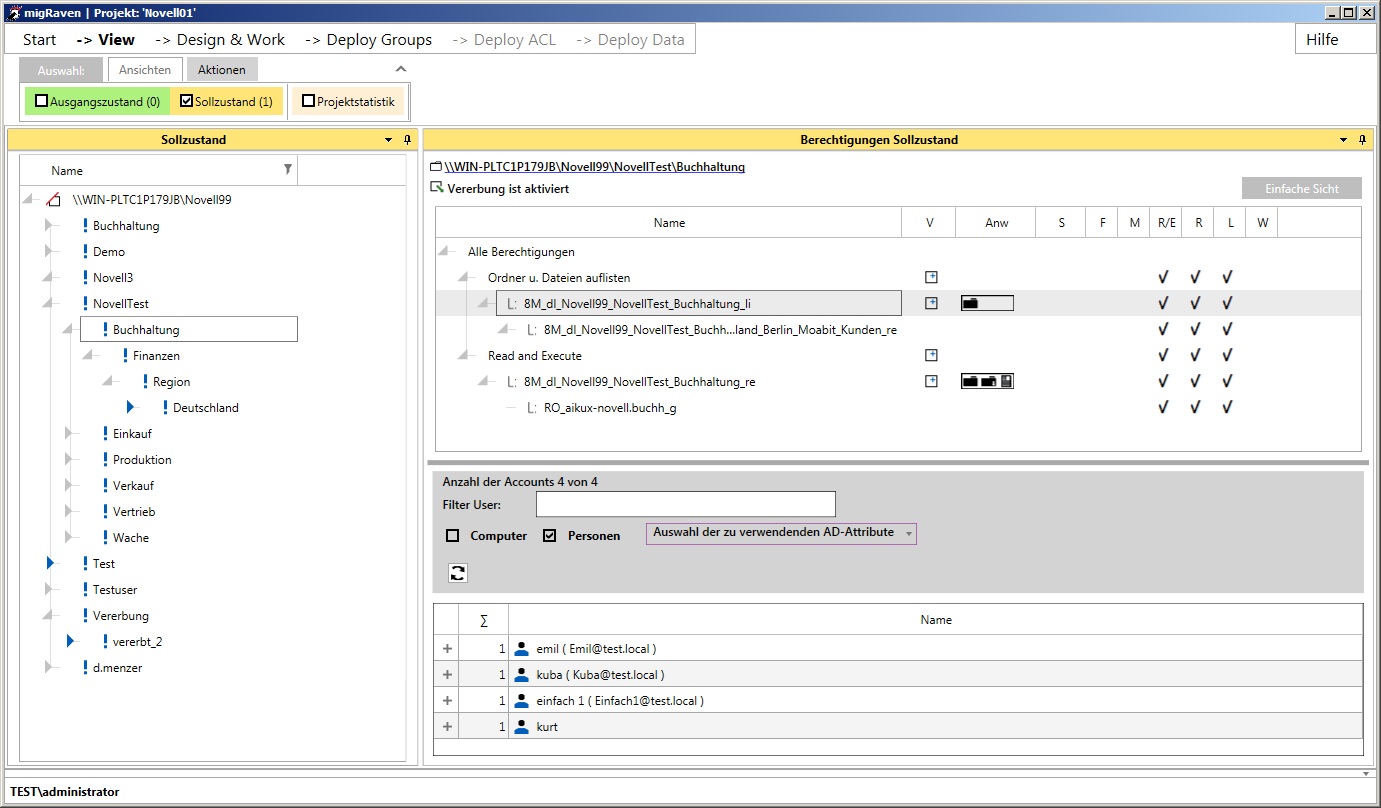
Image 7: Target state with the new list and authorization groups
If everything is correct, continue with 9. ...
4. Write the target environment
4.1. Create and nest new groups in AD - Deploy Groups
4.2. Create target directory on the Windows server - Deploy ACL
4.3. monitoring of results
Check whether the newly created authorizations in the target directory meet the expectations
After successfully creating the destination directory by migRaven the result should be checked. The easiest way to do this is to create a new project and read in the newly created directory tree with the permissions.
Please check all newly created authorizations whether they meet your expectations. Only then should the replication of the data be initiated.
4.4. Replicate old data in the new directory tree - Deploy data
If this target directory is to record your data and act as a new share, then the data now needs to be replicated to the new scope. That can not be over directly migRaven respectively.
Replication can be done in several ways. Robocopy from Microsoft lends itself to smaller amounts of data.
But if the directory tree contained a lot of files, we had a lot of experience with PeerSync. This is a tool that enables true real-time bytelevel replication without the need to constantly compare source and target. Another preference PeerSyncs is support for NetApp.
Done: directories can now be used by the users.
Alt:
ARCHIVE: Source: Novell Netware
1.2.1. Issue permissions with Trustee.nlm
Novell Netware did not yet have a trustee-database.xml. The trustees can be read out well with the console command TRUSTEE.NLM.
An example of the syntax is:
TRUSTEE / ET / D SAVE vol1: \ sys: \ trustee-vol1.csv
/ ET for permissions with no owner
/ D for directories without files
SAVE vol1: \ Save permissions and directories of the volume "vol1: \", SAVE ALL for all volumes
sys: \ trustee-vol1.csv is the output file
Contains the output file also other than Trustee information can with
FIND "TRUSTEE" trustee.csv> only_trustee.csv
a file reduced to the TRUSTEEs will be created.
1.2.2. Conversion from ASCII to ANSI
Result of Trustee.nlm is a CSV file. It is generated in ASCII format. If entries contain umlauts or special characters, these are a problem. The file must be converted to ANSI format.
This is possible, for example, in the following way with Microsoft Excel:
- Call Microsoft Excel
- select the "Data" tab
- Select “From text” in the “Retrieve external data” section and import the output CSV file
- with the parameters:
- File Type: Separated
- File origin: MS-DOS (PC-8) !!!
- Separator: comma
- and finish.
Now all umlauts and special characters must be displayed correctly in this file.
If you have several files, it is recommended to automate the conversion from ASCII to ANSI.
With the PC world script Ansi2Ascii.vbs multiple files can be quickly converted from ASCII to ANSI. The prerequisite is that the files have the file type "txt". The converted files can be found in the "ansi" subdirectory.
So that Excel recognizes the comma as a separator, the command "sep =," is entered at the beginning of each of these files (without quotation marks).
Finally, the file types are changed from "ans" to "csv".
Now the csv files can be opened by double-clicking with Excel.
1.2.3. Processing the data
The output file contains five columns for migRaven something needs to be edited.
- 1st column: Only the lines with "TRUSTEE" are required. All other lines can be removed.
Finally, the 1st column can be emptied, but should be retained, for the "depth". migRaven entitle yourself. If you would like to see the directory depth here, you can calculate it with the following Excel command *:LENGTH = (B1) length (CHANGE (B1; "\"))
B1 is the cell with the pathname. It must be adjusted if necessary.
- 2.Path: The volume in front of the directory is removed, the directory is retained. Eg with the Microsoft Excel command *
= SUBSTITUTE (B1; "VOL1:"; ""; 1)
B1 as above. VOL1 is the volume name to be removed. He needs to be adapted.
- 3.LONG: This column can be removed.
- 4.Trustee: At the beginning of all entries in this column, a period must be set, such as .Meier.EDV.KMF. Eg with the Excel command *
= CHAIN ( "."; D1)
D1 is the cell with the trustees, the claimant.
- 5. Rights: The column contains the Novell rights. These must correspond to the Table 2 (see point 1.3.) be converted into NTFS rights. The column with the NTFS rights must then be in front of the trustee column.
* Empty columns must be used or inserted for the calculations. The results of the calculations are to be inserted in the target column (this can also be the column with the formulas) with the option “only values”.
table structure
The table structure for migRaven must the Table 3 (see point 1.3.) correspond:

Image 1: Conversion of the table with the Netware rights into the for migRaven necessary format with NTFS rights