Table of Contents
Task management is a key part of migRaven.one, our solution for migrating your Windows file server with its often historically grown directory and authorization structures.
The integrated task management of migRaven.one takes over the complete project management for the migration of your data. During the migration phase, it ensures that all relevant tasks are coordinated and that IT and the specialist departments are coordinated. This means that every migration project, regardless of size, can run smoothly and in a timely manner.
The task management in migRaven.one briefly explained
On average, 80% of all data and structures are completely outdated and thousands of folders don't even need to be migrated. Task management enables effective coordination with departments and data owners to make quick decisions on which directories to migrate, archive or delete.
The administrators get an overview of all decisions made in the task management. Existing dependencies from directories to linked files or applications can also be documented.
The migration itself can then be time-controlled and automated using scripts.
Video: How task management works
28.09.2022/XNUMX/XNUMX | Presenter: Thomas Gomell
Classic use of task management in migration projects
No clean file server migration can work without the involvement of the data owner. Because the data owners know which directories should be migrated and which are better archived or deleted.
It is therefore essential that the administrators coordinate with the file managers. This is exactly where the integrated task management comes into play.
First, the administrators have to clarify who the data owners are in the directories. After that, by creating tasks, the data owners can tell the administrators what to do with the directory (migrate, archive, delete) and whether there are any dependencies on other linked files or applications.

Step 1 - Identification Data Owner
Ideally, in migRaven already stored in the directory who the data owner(s) are. Then all the administrator needs to do is look at the directory tree in migRaven. If one or more data owners are specified in a directory, the "Set data owner" icon is highlighted in blue:

As an example, we would like to display the data owner in the Administrator role in the Personal directory. The icon is already blue in the directory tree, so data owners are stored.
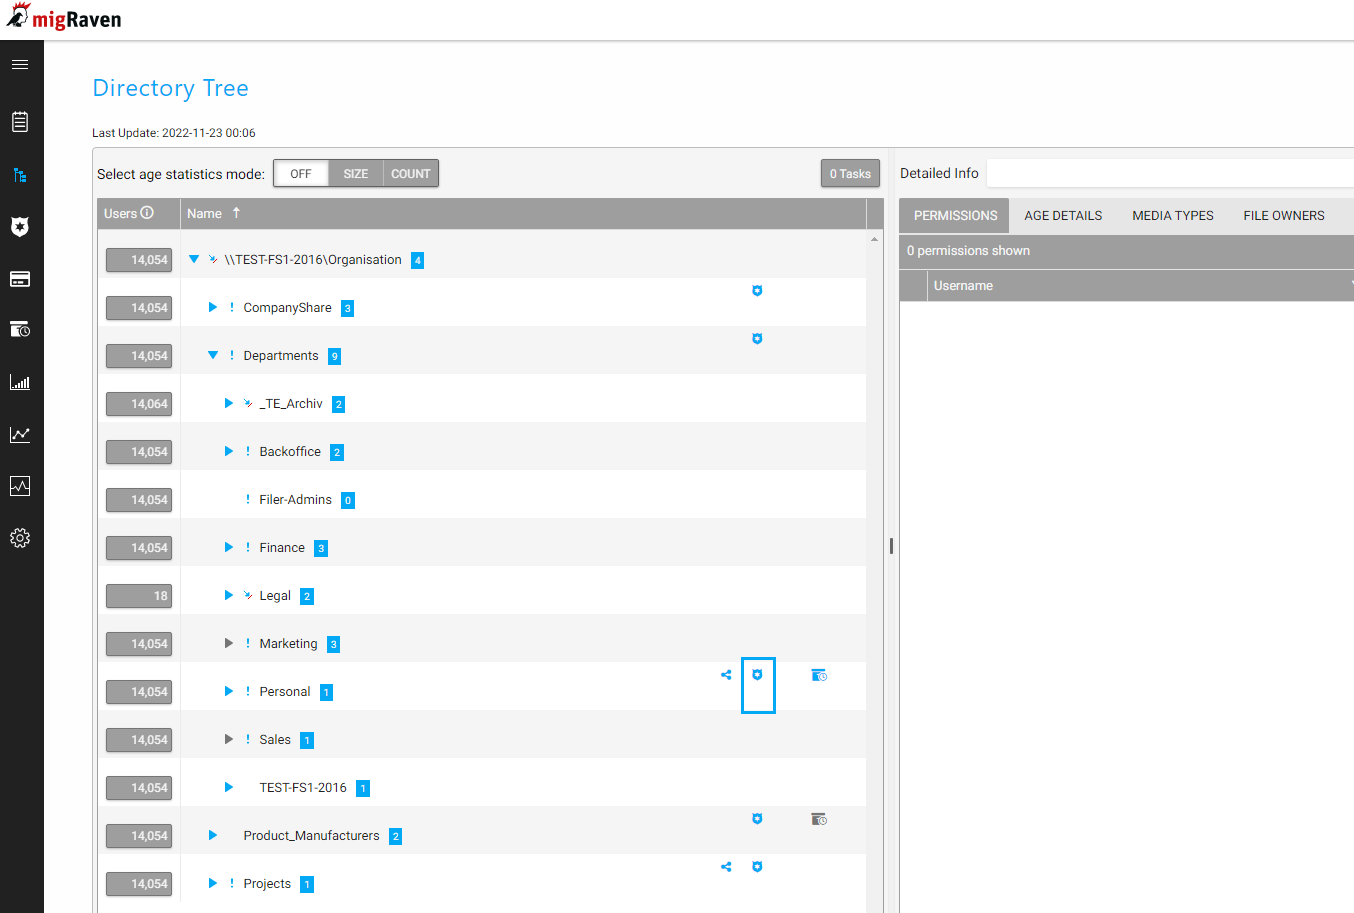
Clicking on the icon opens the “Manage directories” sidebar. We see that Patricia Personnel is entered as the only data owner.
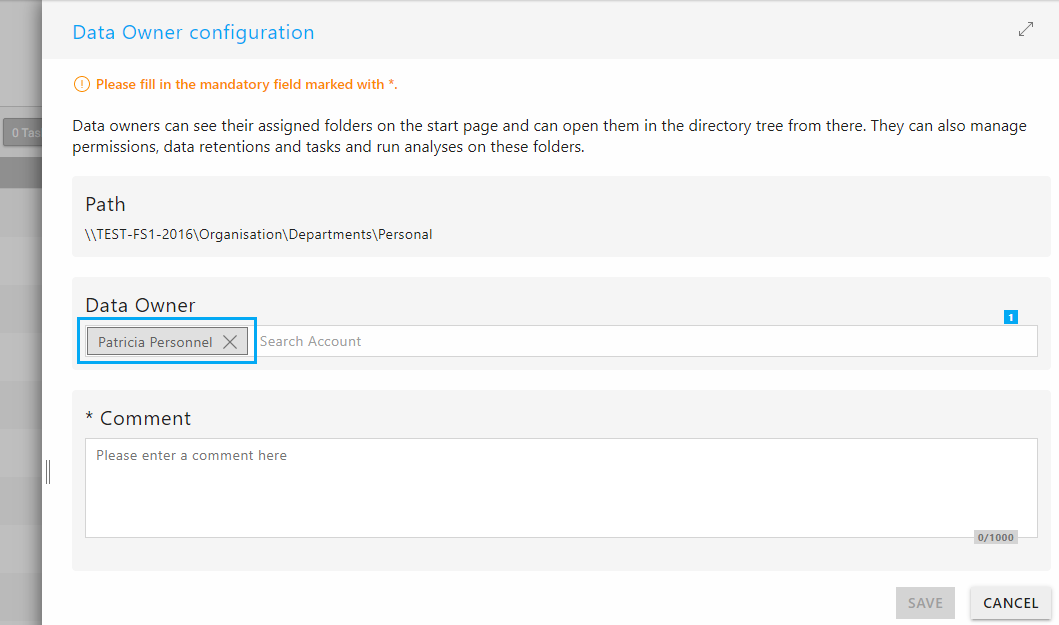
Now the administrator can contact Ms. Personnel and ask her to create a task for this directory. See step 2 for details.
But how can you identify the data owner if no one has yet been set in the directory and thousands of users are working in the file system?
migRaven.24/7 solves the problem by scanning NTFS file owners and providing an overview of who created how many files in a directory. The user who created the most files is either the data owner of the directory himself or knows the data owner.
In the role of administrator, we therefore click on the requested directory (1) in the directory tree. Detailed information appears in the area on the right. Next, we click on the "File owner" tab (2).
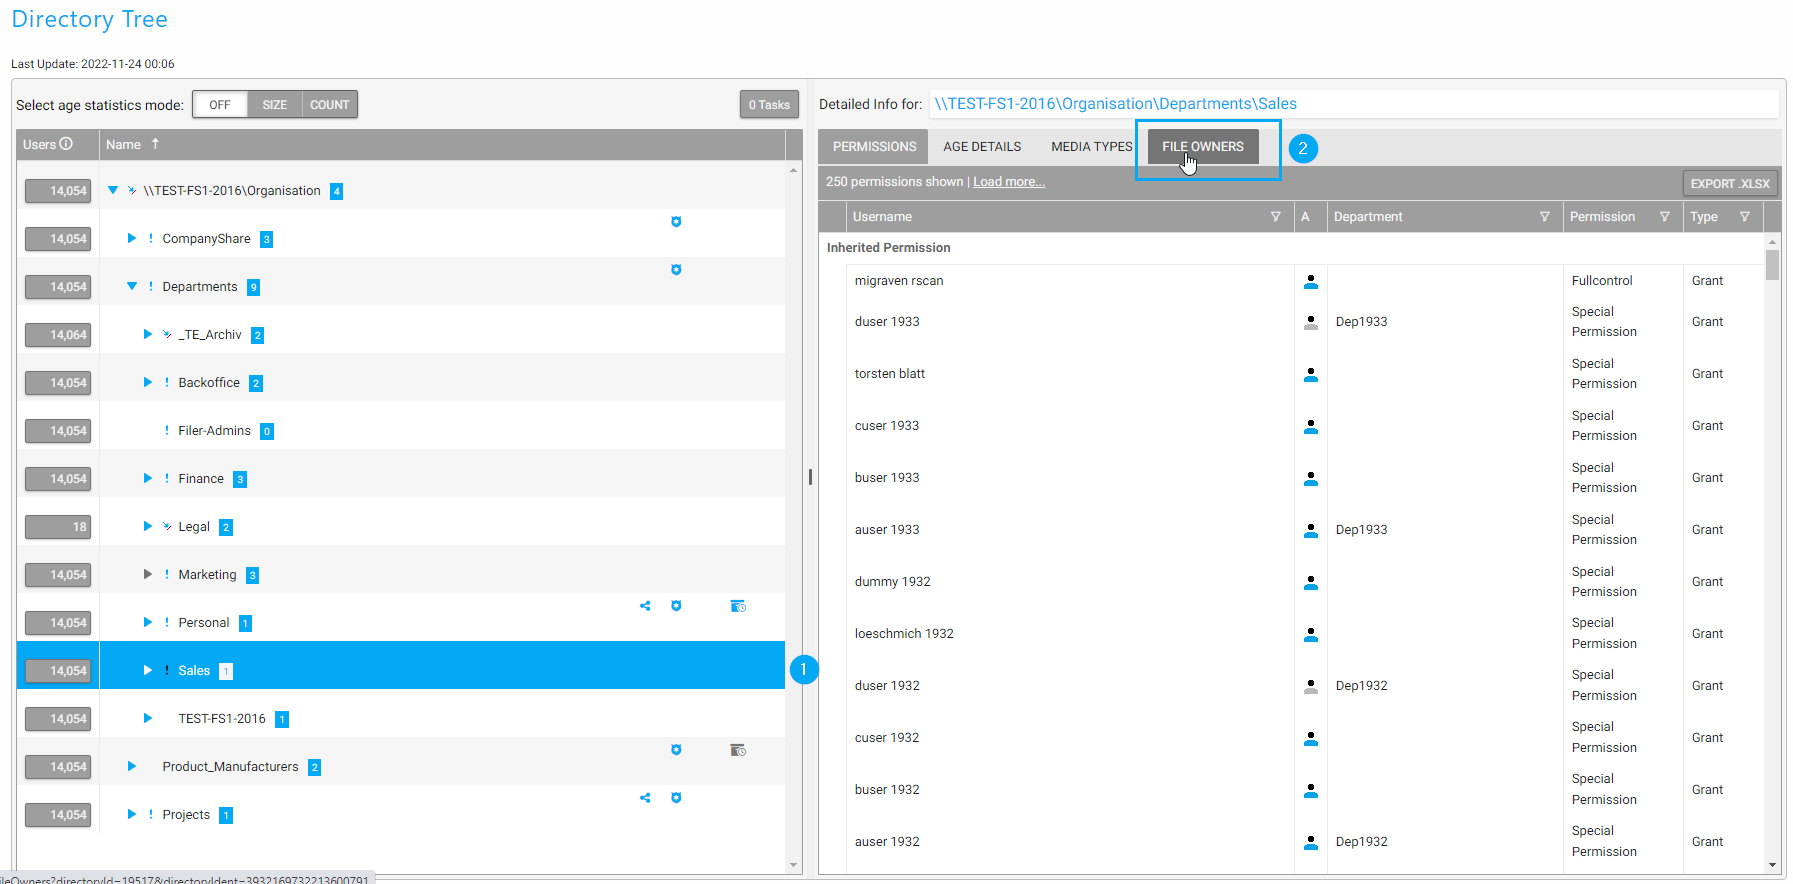
A list of all user accounts that have created files in the directory is now displayed.
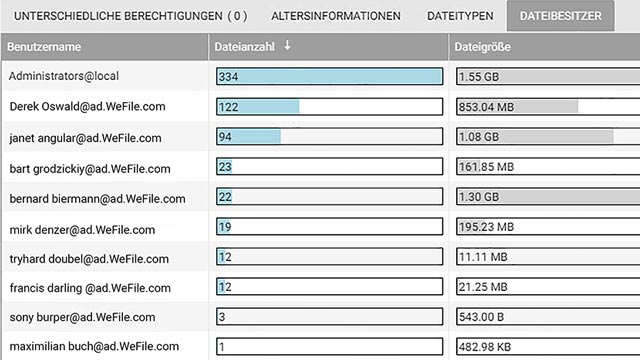
The following applies: the user who created the most files is either the data owner of the directory himself or knows the data owner.
In this case, we would therefore address Derek Oswald and Janet Angular as administrators.
Once the data owner has been clarified, we can assign data owner rights to the identified file owner. To do this, we click on the data owner symbol in the directory tree for the relevant directory and enter the person as directory manager.

From this point on, the data owner can become active himself and enter tasks for the further procedure in the directory. See step 2 for details.
Step 2 - Creation of a task by the data owner
The administrator now knows who the data owner is and the data owner can now in migRaven go through its directories and decide which directories to migrate, archive, or delete. The data owner can record this decision in a task. The created task is then in the task management for him and the migRaven Administrators visible.
Creation of a task on a directory
In the directory tree there is the possibility to create a task for each directory. With mouse-over the icon bar appears at the desired directory. The icon for creating a task looks like this:

If no task is stored, the icon is grey, if there is a task, it appears in blue and is also displayed in the directory tree without mouse-over.
In the example, a task for the "Personnel" directory is to be created:
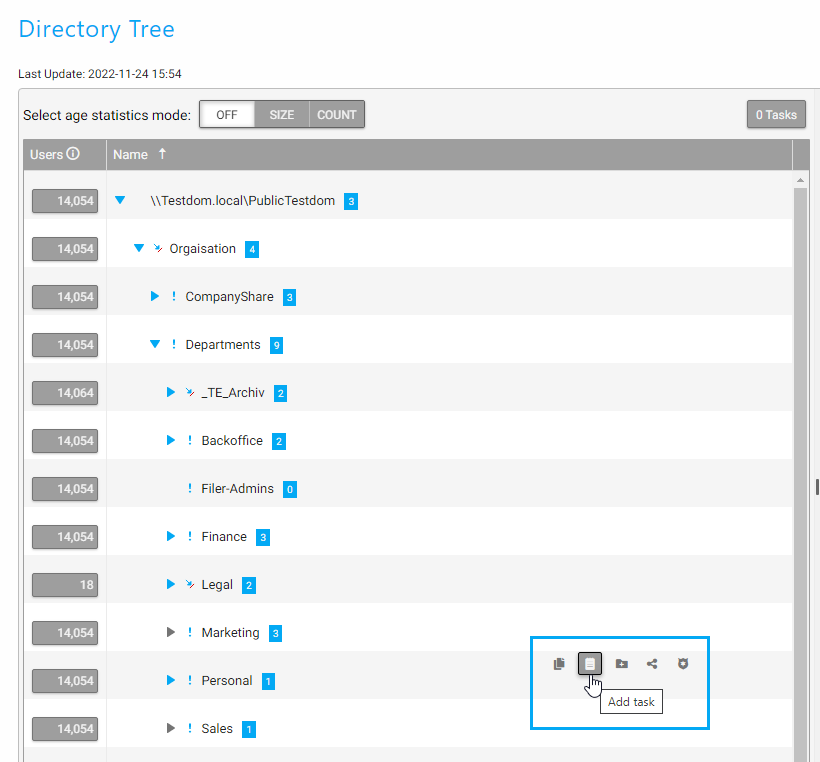
Clicking on the task icon opens the “Create task” sidebar with the following four blocks:
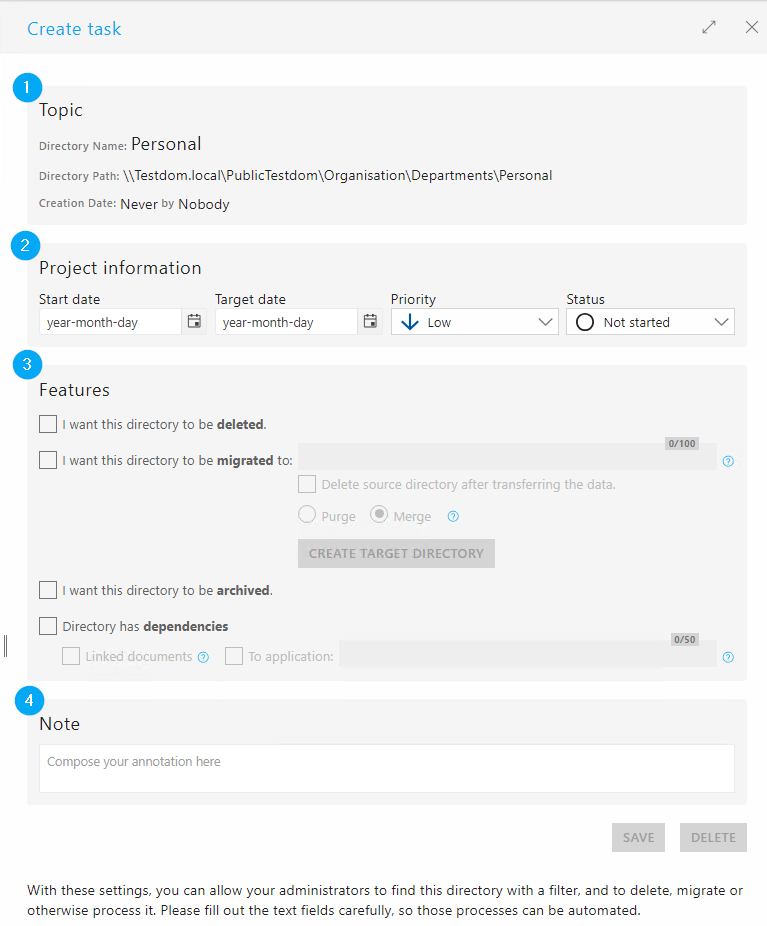
If you click on the image, the original size will be displayed.
- Overview:
Directory name, path, and creation date information - Project information:
The following attributes are set here: start date, target date, priority, status
A pair of First Date and the status "In progress“ are always required because migRaven.one after this in the migRaven database and it triggers the execution of the task. - characteristics
This defines how the directory is to be handled.
The following options are available: The directory should be deleted, migrated or archived. You can also specify whether there are dependencies on linked files or applications.
Note on the checkbox: “Delete home directory after data transfer”:
In the case of a migration, a new target folder can be created in the form or an existing folder can be selected. The migration runs in such a way that the files are copied to the target directory for the first time when the start date is reached. When the target date is reached, if the “Delete source directory after data transfer” checkbox is set, the data is copied for the last time and the source directory is finally deleted. (Default option). If the checkbox is deactivated, the home directory remains. This option is only recommended in agreed situations, as inconsistent data statuses can arise if work continues in both areas.
Note on radio buttons “Purge” and “Merge”:
This choice affects how data is transferred, especially in the context of using Robocopy within the migRaven.one frameworks.
The “Purge” option is ideal when transferring data to a new, empty directory. In this case, existing files in the target directory are removed so that only the new data remains.
The “Merge” option whereas it should be used when migrating data into an already existing directory with existing data. The new data is merged with the existing data without any existing data being lost.
For more information and detailed instructions, please visit the official Robocopy page on Microsoft Learn. - Please note:
Notes with additional information can be noted in this text field.
With these settings, the data owner allows the migRaven Administrators to find the directory via filters and delete, migrate or otherwise edit it. Careful filling of the fields is very important for the greatest possible automation of these processes.
Step 3 - View all tasks in Task Manager
The task management shows an overview of all created tasks. At this point, data owners can see and edit all tasks they have created themselves. Administrators get a view of all system-wide tasks, can process them and, if necessary, consult with the data owners.
In task management, you can see at a glance whether a task is being processed, how the directories should be handled (migrated/archived/deleted), by when the task should be completed and who the data owner(s) are. Reminder e-mails can be sent directly from the task management. Completed tasks can be deleted to keep a better overview of the open tasks.

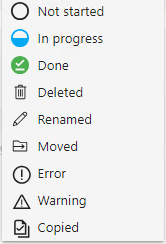
Number 1: Status
Display of the status of the processing status. The status information is provided at number 5, the processing of the task. The following statuses are possible:
Number 2: characteristics
The characteristics are displayed in the directory paths line. These already make it clear in the overview how to proceed with the directory. Activated features are highlighted in blue. With mouse over, the information tooltip for all features is displayed.
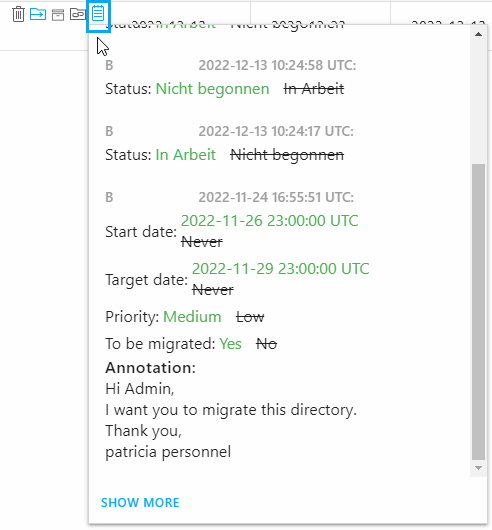
Note: When you mouse over the last icon, the task icon, the history and the comment on the task are displayed:
Number 3: data owner
All registered data owners of the directory are specified here. Extended information about the user account is displayed on mouse-over. More on this.
Number 4: Delete Source folder
If this option was activated in the task, the source directory will be deleted after a successful migration.
Number 5: Merge/Purge
This column shows whether the Merge or Perge option was selected for the migration task. Users can choose between these options when creating migration tasks. The Purge option should only be used when migrating to empty, new directories. The Merge option if data is to be migrated to inventory directories.
Number 6: Edit task
Clicking on the edit symbol takes you to the task mask. The current status can be entered here by the administrator. For more information, see “Step 2 – Creating a Task by the Data Owner”.
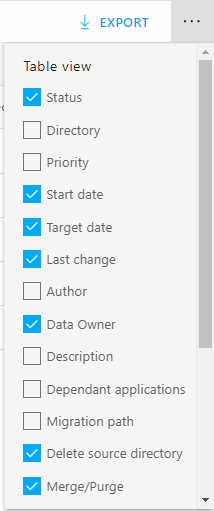
Number 7: selection menu
In the menu, additional columns can be displayed in the table view. There are the following columns:
Number 8: Send reminder emails to data owners
The corresponding data owners can be selected via the checkbox in the first row of the table. An e-mail is sent for each data owner with all paths (directories) that have been checked and for which this user is the data owner.
Number 9: Filter options
There are 5 different ways to filter the table results through existing filters. At the same time, the filter drop-down menu displays short statistics on the respective characteristics based on the entire list of results.
- Types: This filter filters by task characteristics (delete, migrate, archive, dependencies)
- Status: This allows all tasks to be filtered according to their status
- Owners: This allows you to filter specifically according to the tasks of a data owner
- Deleted/Active tasks: This means that only deleted or only active tasks can be displayed.
- Tags: This filter can be used to target specific tasks Tags be filtered.
Step 4 – Processing tasks (bulk process)
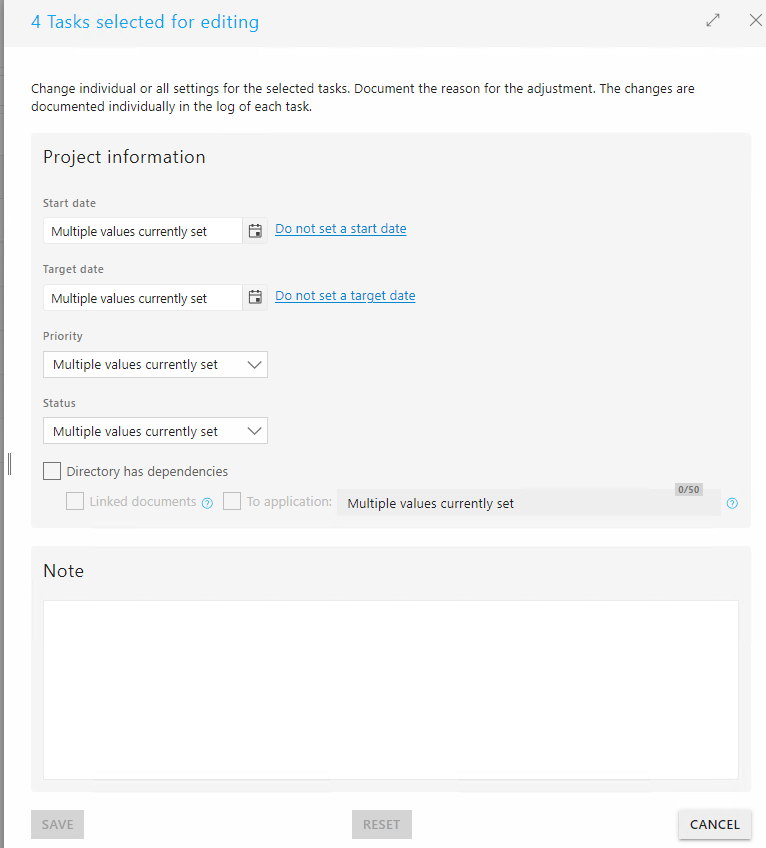
Our bulk editing feature allows you to update multiple tasks at once. You can easily select a group of tasks and change their status, start date, due date, priority and dependencies in one step. All changes are automatically logged in the task log so you can track exactly what was changed.
First select the tasks you want to work on (1). Then click on the 'Edit selected' button (2).
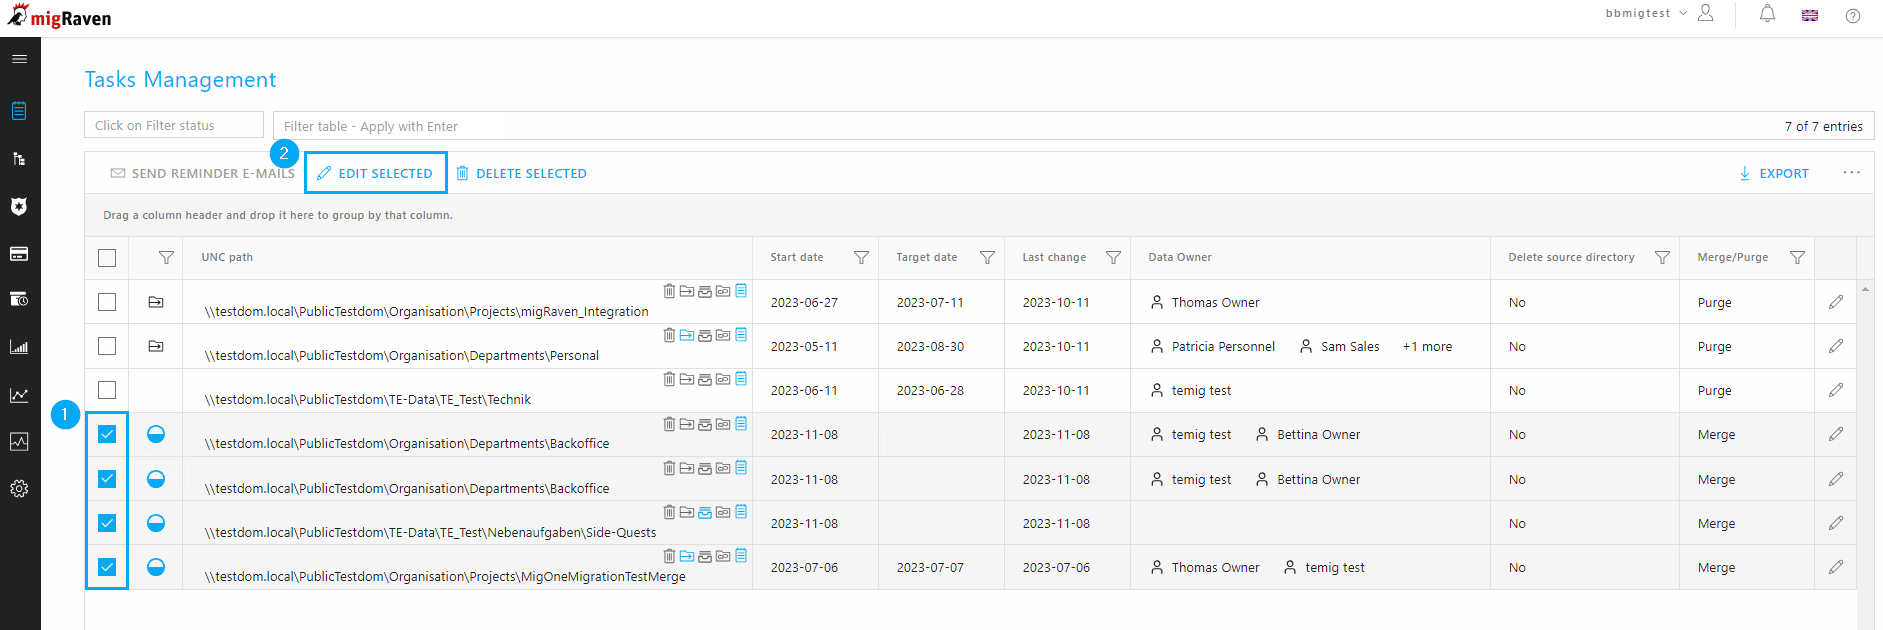
A sidebar will then open where you can make changes to all selected tasks at the same time.
